Same Day Shipping 

On in-stock orders placed by 3:00pm EST (Monday-Friday)

RoHS & Reach Compliant 1-440-934-0444

Resources
  • About
  • Shipping Info
  • FAQs
  • Learning Center
  • TechTalk Blog
Contact
  •   Call Us 1-440-934-0444
  •   We're online Live Chat
  •   Contact Us
My Account
  • My Dashboard
  • My Quotes & Custom Parts
  • My Orders
  • My Compare
  • My Project List
  • My Wishlist
  • Sign Out
My Cart
Toggle Nav Polycase Logo Polycase Logo Toggle Nav
Menu
  • Products
    • Enclosure Categories
      • By Material
        • Plastic
          • ABS
          • Polycarbonate
        • Metal
          • Aluminum
            • Diecast Aluminum
            • Extruded Aluminum
          • Steel
            • Stainless Steel
            • Carbon Steel
      • By Application
        • Outdoor
          • Waterproof
          • Electrical
          • Junction Box
          • Pole Mountable
        • Indoor
          • Desktop
          • General Use
          • Handheld
          • Key Fob
          • Plug-in
          • Potting Box
          • USB
          • Indoor Waterproof
      • By Design Feature
        • Battery Compartment
        • Clear Cover
        • Din Rail Enclosure
        • Flanged/Surface Mount
        • Hinged Cover
        • Knockout
        • Lockable
        • Low Profile
        • Snap Together
      • By Rating
        • NEMA Rated
          • NEMA 1
          • NEMA 2
          • NEMA 3R
          • NEMA 4X
          • NEMA 5
          • NEMA 6P
          • NEMA 12
          • Show All
        • IP Equivalent
          • IP65
          • IP66
          • IP67
          • IP68
        • UL Listed
    • Enclosure Solutions
      Enclosure Solutions
      for every application
      Shop All Products
    • Accessory Categories
      • Cable Glands, Plugs & Venting
      • Waterproof NEMA Accessories
      • Panels
      • DIN Rail Kits
      • Pole Mount Kits
      • Screws
      • Potting Box Covers
      • Mounting Kits
      • Misc. Accessories
      • Shop All
  • By Size
  • By Series
    • Menu 1 - Tabs
      • A - E
        • AG
          AG Series
        • AL
          AL Series
        • AN
          AN Series
        • BF
          BF Series
        • BT
          BT Series
        • BX
          BX Series
        • DC
          DC Series
        • EK
          EK Series
        • EX
          EX Series
      • F - M
        • FB
          FB Series
        • GS
          GS Series
        • HD
          HD Series
        • ID
          ID Series
        • JB
          JB Series
        • KT
          KT Series
        • LP Series
          LP Series
        • ML Series
          ML Series
      • N - T
        • NX
          NX Series
        • PM Series
          PM Series
        • QS Series
          QS Series
        • RW Series
          RW Series
        • SA Series
          SA Series
        • SB Series
          SB Series
        • SG Series
          SG Series
        • SK Series
          SK Series
        • SL Series
          SL Series
        • SN Series
          SN Series
        • TS Series
          TS Series
        • TX Series
          TX Series
      • U - Z
        • USB Series
          USB Series
        • VK Series
          VK Series
        • VM Series
          VM Series
        • WA Series
          WA Series
        • WC Series
          WC Series
        • WH Series
          WH Series
        • WP Series
          WP Series
        • WQ Series
          WQ Series
        • XR Series
          XR Series
        • ZH Series
          ZH Series
        • ZN Series
          ZN Series
        • ZQ Series
          ZQ Series
      • View All
    • Accessories By Series
      • PCB Mounting Screws
      • PCB Mounting Standoffs
      • Pole Mount Kits
      • DIN Rail Kits
      • Cable Glands and Seals
      • Venting Accessories
      • SHOP ALL
  • Customized Enclosures
    • Menu Item
      • CNC Machining
        CNC Machining
      • Digital Printing
        Digital Printing
    • Menu Item

      Customize Your Polycase Enclosure

      Instant Quote

  • Instant Quote
Account
Search
Advanced Search
  • My Compare ()
  • <
  • Tech Talk
June 21, 2022

Design for Assembly: 12 Design Guidelines to Make Assembly More Efficient

In Electronics Tips
0 Comments
Design for Assembly: 12 Design Guidelines to Make Assembly More Efficient
Share

design guidelines more efficient assembly

“Start as you mean to go on” is an old bit of wisdom attributed to many different sources over the years — and, like many such proverbs, it’s still around because it’s often good advice. How you set up your preparations in the beginning will greatly affect how things look in the end, and that applies particularly well to electronic devices and how they’re designed and assembled.

In fact, there’s an industry-specific set of practices that places that concern front and center — the “Design for Assembly” (DFA) method. Design for assembly makes the assembly process easier, faster and more consistent, and those outcomes all have positive ripple effects for productivity.

These practices have been developed over several decades by some of the electronics industry’s best designers. They’ve given us some legendary successes, such as the Sony Walkman — a device that’s planned near-perfectly for a high-volume manufacturing process, thanks to its simple and elegant design. DFA methods often involve highly technical calculations, including charts that score a design by assigning penalties for assembly times, assembly cost and number of parts. But they can also be broken down into some relatively simple and effective principles that can serve as a guiding light without requiring a designer to spend hours poring over tables. (Our guess is that you do enough of that already!)

At Polycase, we create our electronics enclosures to be compatible with a variety of design philosophies. From easy to assemble snap-together enclosures to enclosures with hinged covers for quick access to internal components, our wide range of options makes it easy to use our enclosures as a foundation for designs solidly grounded in DFA. Thanks to our precision manufacturing, customization services and affordable direct pricing model, our enclosures can be an integral part of your design strategy.

polycase enclosure disassembled

Here, we’ll look at 12 basic principles that can make your devices easier to assemble and your manufacturing more efficient. These aren’t hard and fast rules that have to be followed in every situation, but they’re useful principles to keep in mind for orienting your designs in a direction that creates efficiency at every stage of the product development process. Let’s begin with a quick review of how DFA methodology works.

What Is Design for Assembly?

Design for assembly is a set of best practices for device design intended to make a product easier to assemble and manufacture. DFA strategies emphasize reducing part count and assembly steps while mistake-proofing the assembly process as much as possible. 

Fundamentally, design for assembly means keeping in mind that the device you’re designing now will one day be physically assembled, either by a human or by a robot, and that assembling the device will be much easier if the designer follows some best practices of electronics design. Easier assembly typically translates to lower production costs and smoother assembly operations overall.

12 Key Design for Assembly Tips

1. Look for the elegant solution.

The search for elegance and simplicity should be one of the principles that guides your design from the beginning. You can think of designing for assembly as designing for a solution that reduces complexity at each stage of the process while maintaining smooth and functional operation. As an added bonus, a design that’s easier to assemble will often offer better durability, improved ease of disassembly and repair and a superior experience for the end user.

Simple and elegant solutions often aren’t immediately obvious, so an important part of DFA is allowing some time in the design and prototyping process for each design to evolve. Take your time and try to consider your design from a variety of perspectives — or reach out for feedback from elsewhere in your organization.

2. Integrate DFM (design for manufacture) principles.

The philosophies of designing for assembly and designing for manufacturing are closely linked, since they both prioritize a streamlined and efficient process. Design for manufacturing looks for time and cost savings in creating and procuring the parts used, while design for assembly seeks to improve the process of actually assembling those parts.

The two are so intertwined that they’re often referred to together by one name, design for manufacturing and assembly (DFMA). The takeaway? Many of the key elements you’ll need to consider start at the parts manufacturing stage, so make sure that you’re not neglecting these more granular concerns, even as you’re considering the big picture of how your design fits together.

3. Keep your tolerances realistic.

With modern machining technology, it’s possible to create parts within extremely fine tolerances — but just because you can, doesn’t mean you have to. Parts that need more precision machining will take longer and be more expensive to make. On top of that, creating a system that contains numerous parts with precise tolerances increases the likelihood of problems if one turns out to be out of spec.

keep tolerances realistic graphic

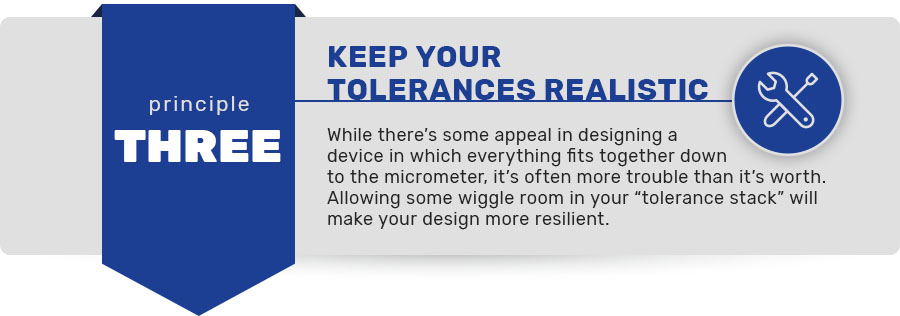
So, while there’s some intrinsic appeal in designing a device in which everything fits together down to the micrometer, it’s often much more trouble than it’s worth. Allowing some wiggle room in your “tolerance stack” will make your design more resilient and reduce the potential for problems.

4. COTS parts can make assembly faster, cheaper and easier.

Designing your device to be assembled with commercial off the shelf (COTS) parts is a great way to save time and money. Many of a device’s key functional components like enclosures, springs, motors and gears can be bought off the shelf rather than made in-house. These commercial parts are just as good as custom ones when purchased from a reputable supplier, and assembly line workers and supervisors will often already be familiar with the processes and tools needed to assemble them.

Reducing the amount of custom machining and fabrication needed can also save you considerable effort during the design process. The fewer custom parts you have to design, the more time and energy you’ll have to focus on the more specific issues of the device at hand.

sk 12 electrical junction enclosure

Polycase offers lots of great options for enclosures that are ready to use right out of the package. Our customers love our enclosures with built-in knockouts for easy assembly and installation, but we even take it one step further by offering customized machining and cutouts on our polycarbonate, ABS and aluminum models. Order your cutouts at the same time you order your enclosures and we’ll ship you complete enclosures ready for assembly in one to three weeks.

5. Choose parts that are easier to grasp and manipulate.

This tip is especially important if you’re designing a device that will be assembled by robots — which, in today’s manufacturing environment, is increasingly likely. Parts that are very small, oddly shaped, slippery or otherwise difficult to grasp and manipulate are all more likely to cause problems with both human and automated assembly. Flexible parts such as cables, gaskets and belts are some of the worst offenders, so reduce the need for these components wherever you can. This problem often goes hand-in-hand with having numerous small parts that could be consolidated into a few larger parts, so consider whether your parts are doing all the work they could be.

6. Design and use parts with built-in fasteners where possible.

Screws, bolts, nuts — they can have their place in a well-designed device. But if you can design yours to do without, it will improve your design’s efficiency and ease of assembly. Traditional fasteners such as nuts and bolts eat up enormous amounts of assembly time, and threaded fasteners can be particularly labor-intensive. Built-in fasteners such as snap fits and adhesive fasteners are easier to use and often don’t require any special tools.

use built-in fasteners graphic

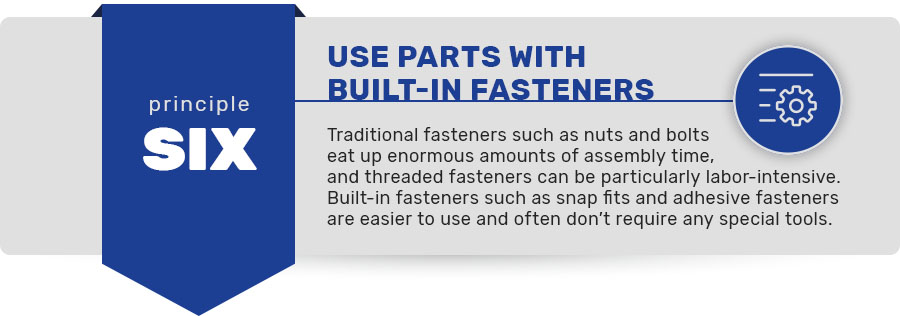
It’s worth noting that adding snap fit fasteners often increases the complexity of the injection molding required to create your components, so design the parts with injection molding in mind and don’t be afraid to bring in input from your manufacturing floor or parts supplier. As with every aspect of a DFA/DFM process, your fastener design should be integrated with the needs of the people (or machines) doing the physical work.

7. Minimize the number of different parts and part sizes.

Take a look at your design’s part count and ask yourself whether every part is truly necessary. Can multiple parts be consolidated into one? Pay particular attention to parts that exist only to connect two other parts. You can often eliminate these by joining the parts directly or using a single part. The idea is to eliminate parts that can be made redundant.

Another important time- and effort-saving tip is to standardize your parts as much as you can. It’s better if an assembly line employee can use one standard size of screw throughout the enclosure rather than having to keep multiple sizes and multiple tools on hand, and it can help simplify ordering, supply chain and inventory procedures.

8. Find ways to create and use modular assemblies in your designs.

Modular assemblies can be one of the biggest time-savers for your assembly process, especially if you’ve got a range of variant devices that can all use relatively similar modules. Creating an ecosystem of modular assemblies is especially good for improving the efficiency and quality of automated device assembly. As an added bonus, devices that use modular design principles are often easier to repair, tweak and customize, increasing their utility and life cycle.

man working with tool on assembly line

9. Minimize your design’s sensitivity.

This is one where Murphy’s Law comes into play. The more chances there are for something to go wrong in the assembly process, the more likely it is that one will occur — so minimize them wherever possible. By designing your device to robustly accommodate the widest range of variables possible, you set yourself up for success. You might not be able to achieve all of these goals all the time, but keep them in mind as you’re workshopping your design:

  • Minimizing “no touch” areas
  • Choosing parts that are less vulnerable to common hazards such as dust particles and skin oil
  • Minimizing delicate assembly motions and chances for accidental component damage
  • Designing machined components with generous tolerances (see tip number three above)

10. Make it as obvious as possible which way a part needs to go.

The more obvious a part’s correct orientation is, the less time will be wasted in the assembly process figuring it out or, even worse, putting it in the wrong way. This can be as simple as adding a small notch to a part to give a visual indicator of its correct orientation. If you can’t make it immediately visually obvious where a part should go, ensure that the part can’t be incorrectly assembled and sent down the line, which can cause a nightmarish cascade of problems.

parts correct orientation graphic

11. Make sure your design teams have a variety of perspectives.

There’s nothing like a pair of fresh eyes to give you a new perspective, and it’s even better when that perspective comes from someone with a different professional background. Getting input from any or all of the following can be a big help in creating elegant and functional designs:

  • Other device and product designers
  • Assembly floor workers
  • Automation experts
  • Parts manufacturing and procurement personnel
  • Quality assurance personnel
  • End user focus groups

12. Leave some space to work.

When you’re considering the size of the enclosure that your device needs, don’t make the job harder for your assembly line. A design where everything fits snugly into the smallest enclosure possible might seem elegant, but it can actually cause problems when it’s time to put it together. If the worker or robot assembling the device doesn’t have room to maneuver their tools and parts, the design isn’t actually elegant, just compact. Take a good look at how much room the assembly process will need and consider moving up a size or two in enclosures. Most Polycase models come in a wide range of sizes.

assembling televisions in factory

These principles must all be kept in balance. For example, reducing the number of parts in a design is great, but not if it creates a fragile, oddly shaped part that assembly robots are likely to break. In the end, the key is to consider the design as a whole and to create something that synthesizes and balances the many elements we’ve laid out here. No one strategy will create the ideal design, so go for a holistic approach instead.

No matter what design principles you’re following, Polycase’s enclosures are designed to meet the most rigorous standards of electrical enclosure performance. Whether you need an ultra-durable waterproof enclosure or a sleek instrument enclosure, our enclosures will surpass your expectations and make it easy for you to focus on the other critical aspects of your design. For more information on how Polycase’s enclosures can meet the needs of your design, call us at 1-800-248-1233 or contact us online.

In Electronics Tips
0 Comments
0 Comment

Stay in the Know

We'll send product news and knowledge right to your inbox

Newsletter
  • Twitter
  • Facebook
  • Linkedin
  • Youtube
  • Products

    • Shop By Category
    • Shop By Size
    • Shop By Series
  • Customization Services

    • Customization Overview
    • CNC Machining
    • Digital Printing
    • Get Instant Quote
  • Resources

      • About
      • Careers
      • Shipping & Returns
      • Terms & Conditions
      • TechTalk Blog
      • Learning Center
      • Reviews
      • FAQS

Contact Us: Real People, Real Service

Toll-Free

1-800-248-1233

International

1-440-934-0444

we're online. chat now.
Polycase Footer Logo
© Polycase 2023 Privacy Policy Disclaimer

We use cookies to ensure that we give you the best experience on our website. To learn more, go to the Privacy Page.

Close